The Korg Lambda in Detail: Outputs, Expression, and more Envelopes
Output Section
As previously described, once at the Lambda’s output section, its two sonic ‘halves’, Percussive and Ensemble, are separately sent to two Chorus Phase lines and returned to the output mixer. The schematic below shows this section, which is on the KLM-184 PCB.
It is here we find the Tone controls for each section, formed of a simple potentiometer/capacitor network. The Chorus Phase sends are post-Tone control.
The four signal lines — Percussive, chorused Percussive, Ensemble, and chorused Ensemble — are routed through four VCAs (voltage controlled amplifiers) which here are the four halves of two AN829 attenuator ICs. The control for these VCAs comes via IC14, a dual op-amp, one half of which governs the volume of the two Percussive lines, the other the two Ensemble lines. IC14’s Ensemble control output is also routed to the Brass VCF cutoff as described earlier, mixed with the Brass fC control potentiometer. The input to IC14 is simply a potential divider and a switched input jack: on the rear of the Lambda the Expression Input takes a 0-5V signal that can be routed via its accompanying switch to govern either Ensemble, Percussive, or both.
The outputs of these VCAs are routed through two dual volume potentiometers and thence two mixer/buffers dedicated to opposite sides of the stereo field, such that the chorused signals appear in the opposite side to the dry signal. That is, half of IC17 (the output mixer dual op-amp) takes the dry Ensemble signal and the chorused Percussive, while the other half of IC17 takes the dry Percussive and chorused Ensemble. This means that when Chorus Phase is engaged for either of the sections, that section will be spread across the stereo field, but when used without Chorus Phase, it will be present on only one side.
Stereo Output 1 and Stereo Output 2 provide the two final audio outputs, Mix Out provides a simple passively-summed blend of the two, and the Headphones output is a low-impedance output taken from the same IC17, left and right fed as per the two Stereo Outputs.
*
This page of the schematic also covers some control functions not previously explained, basically consisting of the panel switches for selecting the presets and related user-variable parameters such as envelope controls. These are located on the KLM-186 PCB.
Percussive Control
The preset selection switches are 1-pole, 2-way. When engaged, a positive voltage is applied to the Mi Off, Vibrato Off and Per. Envelope lines. The operation of the Mi oscillator has been discussed previously, in that engaging a Percussive preset disengages the Mi oscillator from the Ensemble sounds to free it up for Percussive use. The Percussive Envelope is engaged with its variable Decay setting, and Vibrato is removed from Mi.
The Sustain input jack and panel switch, when activated, turn off Q13. Q12 is turned on by the presence of an active Percussive preset switch, switching in turn Q11, and the resulting Sustain on/off control voltage (which, as described earlier, changes the release of the Percussive sound between abrupt and the manually-adjustable Decay setting) is applied to the Percussive Envelope circuit on KLM-185.
Lastly in this small section, Octave mode is selected, which switch selects the straight or divided clock signal for the TOGs.
Ensemble Control
Aside from switching in the presets, the selection switches function to govern the attack and release of the Ensemble envelope, as well as Ensemble Vibrato function.
Firstly, Vibrato: when either Strings preset or Chorus is switched in, the control signal is sent to the oscillator board, KLM-184, which switches the appropriate FETs in or out to add or remove vibrato to all three oscillators (recall also the LFO feeds are out of phase). Note that using Brass and/or Organ alone will have no effect on the Vibrato control signal – that is, Vibrato is only applied when switched on in conjunction with Chorus and/or Strings I/II.
The Ensemble amplitude envelope can be preset, or the user may independently vary its Attack and Release times. The switches select either potentiometers or potential-divers which provide voltages accordingly. The Attack Control (which goes to the Mi envelope control section of KLM-186 as described here) and Release (which goes to the divider/keyer envelopes for Mii and Miii) are directly connected to their destinations; Attack is buffered and level shifted before being applied to the divider/keyer envelopes for Mii and Miii.
Here we can see some operational quirks. Brass has its own envelope as standard, as described here; Organ employs the fixed quick-on, quick-off envelope too, by default; note that by default the base of Q27 is held high, applying a positive voltage to the envelope control lines via D19 and D20. However, when Chorus and/or Strings I/II are switched in, Q27 is switched off by the activation of Q26, hence removing that voltage from the envelope control lines – which are now governed solely by the Attack/Release preset/manual settings. The upshot of this is that a high control voltage gives a shorter time, and thus when only Brass/Organ are selected in the Ensemble section, the preset envelope is applied to all oscillators. However, when either Brass/Organ and Chorus/Strings are selected, it is possible to apply longer attack/decay times but they only apply to Mii and Miii. When no Brass/Organ is present, all oscillators are given full articulation.
To further complicate matters, as soon as any Percussive presets are selected, articulation of Mi is governed solely by their envelope. It is a cleverly designed system and makes sense when followed through, but rather convoluted. I hope my explanation makes sense!
And the rest…
The remainder of the schematic shows a basic power supply taking a mains AC input, diode rectifying it into two rails plus ground, and using fixed regulators to give +/- 15V, with a further +10V output obtained from the positive regulated rail. A power-indication LED and some supply smoothing capacitors completes the description.
*
I hope this detail of the technlogy behind the Korg Lambda is both complete enough to be useful for those who wish to repair one themselves, and to be comprehensible to those who wish to learn about the kind of electronics that went into these old synthesizers. The Lambda is a fine example, both physically and sonically, of its time and type; this kind of unit went out of fashion shortly afterwards, and manufacturing costs mean nothing like this will be mass-produced again – one of the attractions of vintage synthesizers, as many enthusiasts may attest.
Thank you for reading, and please let me know if I have made any errors so I may correct them.
*

KLM-183, 184, 186 – Lambda outputs, power supply and panel switches
For some added clarity, here is a block diagram of the Lambda’s structure:
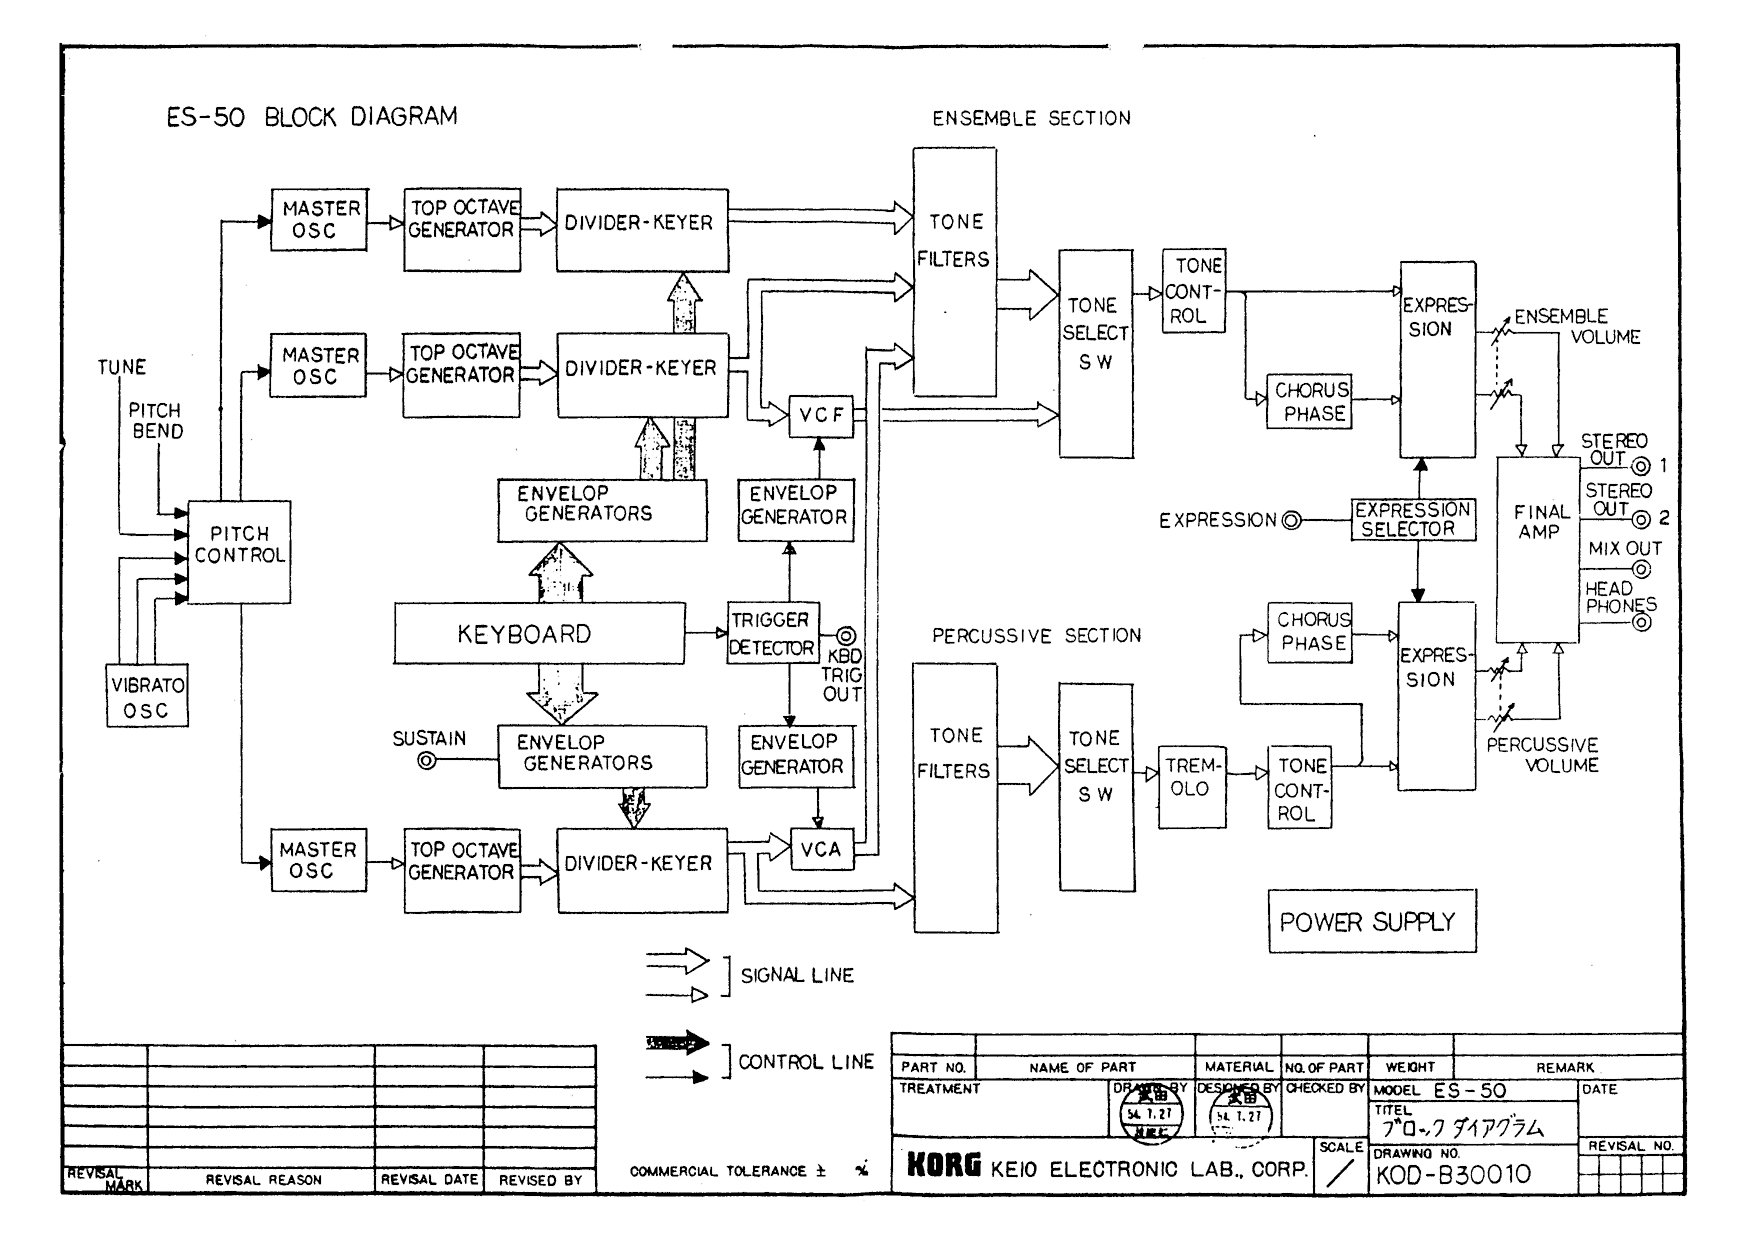
Lambda block diagram
The Korg Lambda in detail: Brass, Tremolo, and Articulation
LAYERING AND FILTERING: Part 2 – Brass, Tremolo, and articulation
There are a number of other sections of this page of the schematic that require our attention. These are the Brass sound shaping circuit, the Tremolo circuit, and the Ensemble Mi (the schematic designation for the summed output of oscillator 1) envelope circuit.
THE BRASS FILTER
The Brass filter is a little more complex than the others in that it is not tuned to a fixed frequency but is voltage controlled and has its own envelope generator: when a key is pressed, the envelope sweeps the (12dB resonant low-pass) filter cutoff frequency up and then back down in a predetermined way. This happens every time a new key is pressed across the sum of the audio signal for the Brass preset, the upshot of which is that if a number of keys are pressed at the same time, they will articulate simultaneously; if some keys are held and others added, the new notes will be articulated as expected, but the existing notes will be re-articulated also. This sounds more limiting in description than it is in practice. The envelope can be observed at Test Point 45.

Korg Lambda Brass envelope single trigger

Korg Lambda Brass Envelope retrigger
The trigger for the filter is given at every new keypress. This is generated by a dual comparator formed around IC3 (see the schematic, below): when the input voltage (from the keyboard switches) changes, the comparator generates an output pulse. The keyboard trigger line provides a voltage that increases in (negative) magnitude according to the number of keys pressed. In the following image, you can see the result at Test Point 24 of holding a number of keys, releasing them one by one, then pressing more keys again one by one:

Korg Lambda multiple keypress voltage
One half of the comparator is fed directly, the other through a low-pass filter formed of C3 and R23, which delays the duplicate signal to the other half; the resultant flip-flopping output is fed to logic gates and then to both the Brass filter envelope trigger, and the transistor buffered output of the Trigger Out jack. The signal at the jack can be observed to be normally positive (around 5V) but when a key is pressed the trigger goes low (around 0V) for the duration of its holding. If, during a held note, another key is pressed, the signal goes positive briefly (for around 10ms) before returning low. In this way every keypress, solo or in combination, results in movement of the trigger signal. Test Point 33 shows the Trig Out in action:

Signal at TP33 Trig Out on a single keypress

Korg Lambda TP33 Trig Out retrigger signal
Within the Brass circuits, the trigger pulse is directed through a simple network of diodes, resistors and capacitors to produce a fixed-time attack and decay envelope. This passes through a transistor pair via a resistor to the current control inputs of IC13, an LM13600 dual OTA (operational transconductance amplifier). Without going into detail about what that is, its purpose here is to act as a kind of voltage-controlled resistor, in the place of a fixed resistor in a standard fixed-frequency low-pass filter. The two stages make this a 12dB LP. The filter is given its audio input at pin 13, consisting of two pseudo-sawtooth waves at 16′ from Mi and Mii. The cutoff is varied by the signal present on the current control pins, resonance is fixed by IC20 in the feedback path, and the audio output at pin 8 is then switched into the Ensemble mix as with the other presets of that section.
The cutoff frequency is also governed by the front panel control Brass fC which is simply a potentiometer providing a variable voltage, and by the signal present at the Expression input jack, which takes a variable input from 0-5V and can be directed to various control points. Here, the Expression voltage, if selected to control the Ensemble section, is mixed with the Brass fC voltage and the envelope before the transistor pair Q3, which in turn drives the current control inputs of IC13 via a resistor.
THE TREMOLO CIRCUIT
Tremolo, a slow undulation of volume, is an effect that is applied in the Lambda to the Percussive section mix. The output of the Percussive summing op-amp (IC25, pin 1) is directed to both the Tremolo switch and the input of the Tremolo circuit. The switch selects either the straight output or the Tremolo output, and routes it to the next section of the Lambda.
The Tremolo is accomplished by using an LFO (low frequency oscillator) to drive a VCA (voltage controlled amplifier), which passes the Percussive signal. The output is buffered and amplified by two transistors and associated components before feeding the switch. The LFO is comprised of IC11, Q17 and their associated passive components. The depth of the effect is fixed, but the speed may be varied by use of the Tremolo Speed potentiometer. The VCA is a two-transistor form of a type common in Korg synthesizers of the time. Either one or two transistors may be found in this design, with the control being sent to the base, and the audio given to the collector, with the output at the emitter. The input signal is kept low to avoid distortion, and there is appropriate post-VCA amplification/buffering. This type of VCA occurs in the MS series of monosynths, and the PS series of polysynths, among others. It also appears in Roland’s JX-3P, which is unusual as Roland tended to use OTAs in their VCA designs.

Korg Lambda Tremolo waveform at TP50
Mi ENVELOPE SHAPING FOR THE ENSEMBLE SECTION
As has been previously mentioned in the Dividing and Keying section of this series on the Lambda, the shared use of source signal for all the presets leads to a problem when different articulation is required: how are the resultant sounds to be differentiated, given that they are comprised of the same raw waves? This is only partly answered by filtering. The other part of the solution is to cleverly manipulate the volume envelopes.
If no Percussive preset is selected, the Ensemble presets (Brass excluded, as it uses its own envelope and filter system) use all three of the oscillators. We already know that the Percussive section uses only the first oscillator, Mi. When any of the Percussive presets are selected, Mi is given over entirely to the Percussive articulation and is removed from the Ensemble sounds. This allows clarity of articulation for the Percussive section, though the Ensemble sounds are thinned slightly as a result.
This is accomplished by the Mi Off signal line as seen on the schematic, activated by the Percussive switches. As seen on the divider-keyer schematic, the primary articulation envelopes for Mi are Percussive, those for Mii and Miii Ensemble; but switching off the Percussive presets brings into play the extra envelopes on the KLM-186 board shown below, effectively replacing the default envelopes. If only Ensemble sounds are used, sets of VCAs are activated by the Attack Control line (Q 7-10) and Trig line (Q19-24). The former pairs of transistors, coupled with their associated diode/resistor/capacitor arrangement, provide variable length attack and decay parameters as for the Mii and Miii envelopes on KLM-185; the latter transistor pairs, along with their passive components, provide a secondary trigger-pulse articulation to Mi during multiple keypresses. It can be seen that if Percussive switches are activated, the Mi Off line is high, Q4-6 are turned on, and the VCAs are held closed, thus allowing the default envelopes of KLM-185 to be used instead. In this way, either a full Ensemble tone can be heard in isolation, or a slightly thinner Ensemble tone accompanied by a clearly and separately articulated Percussive section can be heard.
EDIT: A reader asked a good question about the ‘global’ envelope for Mi, so I paste my answer here for extra information:
“When there is no Percussive preset selected, the oscillator sum output Mi, if used in a given active Ensemble preset, is passed through the global VCA as you outline. Although this takes its attack and release times from the variable controls in the Ensemble section, analogue variability means they’re not identical. Also there is a ‘squelch’ action, which means that with regards to any notes held down while a new note is activated, Mi is silenced and begins its envelope again along with the new keypress.
Hard to describe clearly. A good way to hear this is to tune Mii and Miii up so there is clearly a difference between the main tuning and the two detuned oscillators. Deactivate any Percussive preset. Set the Ensemble envelope to Variable and increase its Attack and Release times to maximum. Play a single long note on, say Chorus preset (with Vibrato Off for clarity). You will hear all three oscillators, but the two detuned ones may together have a slightly different fade-in and fade-out time to the other. Secondly, play a note and hold it. When the note has faded in fully, hold it and add a note at least an octave away so the two are very clearly distinguishable. You will hear the primary oscillator (Mi) cut out of the original note and fade back in as the new note fades in also.
Not all presets use all oscillators, and especially when combining presets and adding the stereo ensemble effect on one or both preset banks, it’s something one tends not to notice, I think.”
*
We have seen these pages of the schematic before, but for convenience I have posted them here again, as they are referred to in the above text.

Lambda schematic, divider-keyers

Lambda wave mixers, filter banks, tremolo and Ensemble envelopes
The Korg Lambda in detail: Layering and Filtering
In previous posts, I have introduced the Lambda, and described how it generates notes and articulates them across the keyboard. The next step is to explain how those notes get to sound like different instruments. This is done by layering and filtering.
I will split discussion of this page of the schematic into two halves. This half will deal with the basics of wave layering and the fixed filters; the second half will deal with the remainder of the sound shaping at this stage.
*
LAYERING
So far in our study of the Lambda we have arrived at a point where each key gives a set of volume-articulated square waves at its respective 2′ to 16′ frequencies, and these notes are allocated to 12 signal lines: Oscs 1-3, each with 2′-16′ outputs.
Square waves, though they are the simplest kind of divide-down wave to obtain, are not very exciting to listen to, and greater sonic variety is required if we want our presets to sound suitably different and interesting. The two basic waveforms found on most analogue synthesizers are square and sawtooth:

sawtooth and square waves
Without going into detail here about their harmonic content (which information can be seen clearly illustrated here, a square tends to sound woody and a sawtooth buzzy. They complement each other well. If one begins with a sawtooth (as happens most often in VCO-type analogue mono- and polyphonic synths) it is a simple matter, electronically, to generate a square wave from it. Not many synths begin with a square and thence derive other waveforms. The Lambda is one; several, but not all, other divide-down models use this approach.
We have seen in the overview how layering square waves can produce an approximation to a sawtooth wave. Below is an illustration of the result of this process. Electronically speaking, this is achieved by summing op-amps (ICs 2 and 4-7 on the schematic) which use proportional resistor values to sum the incoming squares at particular ratios. For example, Mi (Osc 1) 16′ is fed to IC4 via a 100k resistor, and its 8′ is fed to the same via a 200k resistor. Thus the 8′ output of Osc 1 is present at half the level of its 16′ output. Its 4′ output is fed through via a 390k resistor, which is near enough to giving a quarter of the 16′ level, and so forth across the oscillators and their respective 2′ to 16′ lines.
The first photo shows the signal at Test Point 23 on the schematic. This is the summed pseudo-sawtooth described above. Note I have stretched the waveform to more clearly show the steps. As it is derived from four proportionally-summed square waves, there are 16 steps in total forming the pseudo-sawtooth, though not all are visible in the image:

pseudo-sawtooth at Test Point 23
The next photo shows the signal at Test Point 35, again a summed pseudo-sawtooth from Mi, this time using only three of the four octave footings. Note how the reduction from four to three summed squares produces a much rougher, more notably stepped waveform:

stepped waveform at test point 35
If we follow the paths of all the summed square waves at this point in the Lambda, we can see that the purpose is to provide differently shaped waveforms, built from a combination of squares at different frequencies, that are suitable for use as the basic raw tones of particular preset sounds. These paths are visible on the schematic, and though they appear convoluted, it is possible to separate out the waves from which each preset should be derived and, in the event of a fault such as a TOG failure, to use this information to isolate the defective oscillator/s.
*
FILTERING
Once the waves are summed, they are passed to fixed filter banks. Each filter bank represents one preset sound, except in the case of the Organ preset, which uses three parallel filters, and the Brass, which has its own voltage-controlled filter (VCF). More on that shortly. First, the fixed filters.
I will not here go into the technical details of how a filter works. Illustration can be found elsewhere on the matter, so I’ll simply state that the purpose of filters in analogue synthesizers tends to be to remove harmonics – start with a harmonically rich sound, smooth out harmonics below/above/around a certain frequency (the cutoff), and by the use of feedback boost at that frequency in a controlled way (resonance or Q). Harmonic content is one of the major determining factors in how a sound actually sounds, and this is one way to govern it that is easy to achieve in analogue electronics.
Fixed filters exist for the Strings II, Strings I, Chorus, and Organ presets in the Ensemble section. In the Percussive section, fixed filters exist for the Electric Piano, Clavi, Piano, and Harmonics. There is also a fixed filter for the Key-Click, a sound that is not switchable independently, but which is mixed with its own volume control into the Electric Piano sound. It is generated by filtering the key-trigger circuit output that provides a short pulse whenever a new key is pressed. The trigger circuit is used for other things too, more on which later.
The filters are broadly very similar across the set: they are a mixture of 2nd-order (ie. 2-pole, or 12dB) low- and high-pass active filters using RC networks and op-amps. Filter design and topology will not be elaborated upon here, but suffice to say the filter banks provide adequate tone-shaping to individuate the various sounds, despite them sharing their originating material.
Though the filters are fed from common sources in varying amounts, their outputs are switched on a per-preset basis and the combined switched-in signals are summed by another op-amp, one in the Ensemble section and one in the Percussive section. Thus, for example, the output of the Strings II filter bank has a simple open/closed switch to include or exclude it from the mix input of IC25, as do the Strings I and Chorus filter banks, while the Organ is derived via three parallel filter banks that are mixed passively using resistors before being collectively switched into the Ensemble mix. The same procedure is followed for the Percussive section. IC25 provides, on pin 1, the combined Percussive signal, and on pin 7, the combined Ensemble signal.
*
ADDITIONAL INFORMATION:
WAVEFORMS BEFORE AND AFTER FILTERING
Considering the rather rough stepped waveforms illustrated above, one might think the Lambda’s raw waves would sound too brash; the sharp edges of the steps are manifest as high-frequency content, and especially in the lower registers can effect a kind of aliasing tone, where one hears a high-pitched background whine behind the desirable tonal content that is likely to be displeasing, even distracting. It should be noted, however, that this is not necessarily a problem, as the Lambda’s filters remove much of the undesirable content from these stepped waves.
Below is an illustration of the signal at Test Point 26. I have isolated Miii so there is only one oscillator output present here. This is the input to the Strings II filter, played somewhere near the middle of the keyboard. Note the obvious stepping:

Osc 3 signal going in to the Strings II filter at TP 26
The subsequent filter removes frequencies below and above a certain window; note in the next illustration how the steps have been smoothed as the high frequency content is reduced (to put it more simply, the sudden jumps are ‘slowed down’ to a more gentle slope):

Waveform at the output of Strings II filter
Three points to note here: firstly, the smaller steps are smoothed to a kind of slightly wavy slope, so although the harshness is gone, there will still be a slightly discernible brightness to the audio signal present as a quiet multiple of the fundamental of the note played; secondly, the falling edge of the sawtooth is also slowed to a slight slope, which is here the leading edge, and which leads to point three; that the waveform is inverted from the original, flipped upside down by the activity of the op-amp buffer IC25. This reading was taken at TP 48. Inversion has no effect on the audible content.
Due to the fixed cutoff points of these filters, low notes will exhibit more artefacts than high ones. With the user-adjustable filters wide open and the lowest notes played, some of these, though reduced, are still present; whether this is a problem depends on how one likes to use the Lambda.
*
Here is the page of the service notes that both this and the next post deal with:
Lambda wave mixers, filter banks, tremolo and extra Ensemble envelopes
In the next post I will discuss the remainder of the KLM-186 board as depicted on this page of the schematic.
